
Select motif in the digital templates
Print the template onto tracing paper and cut it out along the black lines. It's important that the printer settings are set to 100% for the size of the motifs.

To add atmospheric lighting to your cast house, you can drill a small hole in the bottom. This allows you to easily insert a string of lights or a small LED light from below.

With the fixing hooks from our shop, you can easily attach the string of lights inside. This ensures the light is evenly distributed throughout the house – and everything stays neatly and safely stored.

I used Ponal Express to glue the individual pieces together – it sets super quickly. I attached the tracing paper with Tombow glue, and finally, I simply placed the cast panel over it. This little glow-in-the-dark wonder is complete!

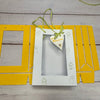
Pair text with an image and tell your customers something about this product, collection, blog post or a promotion.

Schritt 5: Kleben
Verklebe zunächst die seitliche Klebelasche, um die Grundform der Tüte zu schließen. Anschließend werden die unteren Klebelaschen nacheinander umgeklappt und festgeklebt. Diese Reihenfolge sorgt für eine stabile Verbindung und einen sauberen Boden, sodass die Tüte ihre Form sicher behält.

Schritt 6: Lochen
Markiere zunächst die Positionen der Löcher. Nachdem die Tüte vollständig verklebt ist, werden die Löcher mit einer Lochzange gestanzt. Fädle anschließend das Band durch die Öffnungen und verknote die Enden. Dadurch lässt sich die Tüte einfach verschließen und ansprechend gestalten.


